Showing posts with label work. Show all posts

Wednesday, November 11, 2009

Celtic Stamps on Stone Tile

Celtic Stamps on Stone Tile

Wyndsong Designs on Etsy sent me a message to let me know about these gorgeous tiles she had created with our Celtic Knotwork stamps. I love how she arranged the different stamp elements.

Celtic Stamps on Stone Tile


Celtic Stamps on Stone Tile


And - we are very behind on this, but we were a featured manufacturer on http://scrapbooknewsandreview.com/ in October. There are some wonderful projects posted on the site and in the forums using our stamps. I will post images soon...

Sunday, December 7, 2008

Embossed Velvet Pillow Cover

Embossed Velvet Pillow Cover

Created this pillow cover for a tutorial for a magazine. Now the publishing has been pushed back a bit. I am tempted to post the tutorial on Instructables.com and just come up with a new one for the magazine instead... except I know it would end up as another last-minute frantic effort.

Now on our Etsy shop. More photos up on our Flickr account.

Embossed Velvet Pillow Cover
"18 x 18 inch throw pillow cover. Dark turquoise acetate/rayon velvet front, sage green Dupioni silk envelope back. Dry clean only.

Hand-embossed mainly using stamps from our Celtic Knotwork Triple Twists rubber stamp set:

http://www.etsy.com/view_listing.php?ref=sr_list_1&listing_id=17956624

Also using bubbles, droplets, and triskeles, from our Celtic Knotwork and Fish, Waves and Bubbles sheet:
http://www.etsy.com/view_listing.php?listing_id=13817094

The embossed images are created using heat, producing crisp, sunken and iridescent images that can appear shadowy or very reflective depending upon the angle.

For more information about the velvet embossing process: http://www.instructables.com/id/Emboss_Velvet_with_Rubber_Stamps_and_a_Household_I/

Note: We "tiled" a number of the stamps at once - we arranged them on a large block so that they were all heat embossed at once. The stamps that are very close together were not embossed in succession.

Saturday, March 15, 2008

Plugging along...

(Originally posted on Feb 3, 2008)

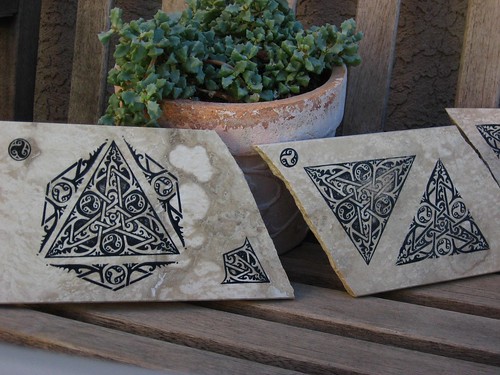
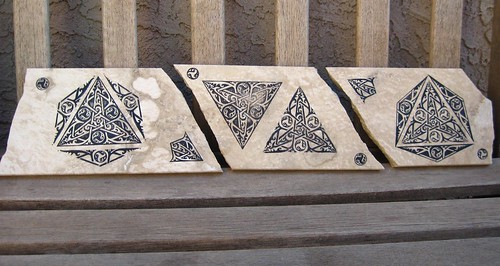
I think I am calling this image "done". This image is grainier than the working file, obviously:


I had forgotten how involved "cleaning up" an image for a stamp can be! I made changes to the image and had to determine how thick to make the black and white spaces, etc. I plugged my tablet into the computer and was able to make use of the pen feature, which improved things, even though I am still getting used to it as a tool. I just can't use a regular mouse to draw anything. In the past, I had to tweak what I could on the computer, then print the file to do any real drawing/edits by hand, then scan it back in, tweak some more, and repeat. Of course, each time I had to do that, there were more "artifacts" in the scanned image file that had to be cleaned... shadows, paper fibers, bleeding from the ink, smudging.

Good to finally start getting the hang of the tablet. I bought it years ago on the advice of Rachel Anderson. I bought it over Ebay from a store called "Geek Boutique". I picked it up in person and they were located in a storefront that used to be a Woolworth's my family went to a lot when I was growing up.

Sigh, Woolworth's...

Now - to work on the bird or something else...